Controlling an Electriq iQool AC with ESPHome and Home Assistant
I recently got a pretty neat all-in-one air conditioner to heat my frigid Scottish garage in the
winter. CNC machines don't like the cold, and neither do I! My unit is an "electriQ iQool 12000 BTU
Wall Mounted Air Conditioner with Heating Function", product code IQOOL-SMART15HP. I quite like
it, but when I got it I really wanted to be able to shout at Siri to turn the garage heat on so
it'd be warmer by the time I went out. And I succeeded in this mission! By flashing ESPHome to the
integrated Tuya TYJW2S-5V-YA module, I can now control this AC perfectly from Home Assistant and, by
extension, Apple's Home app.
Investigation
TL;DR skip to the ESPHome config
There is vanishingly little documentation for the iQool online, so figuring out some of the finer details of this guide took a long time and/or a lot of trial and error. But. It turns out this unit is almost identical to the Qlima "Monoblock airco cooling and heating WDH 229 PTC white". I read a press release quoting the Electriq CEO saying he goes to the factories that produce whitelabelled units for other manufacturers and buys a bunch straight from the source, so this makes sense.
Knowing these units are very similar, this was incredibly useful information as the WDH 229 PTC datasheet mentions Tuya support. At last! After ages of searching I've found the key piece of information I need!
Do you know what else contains this key piece of information? The long section of the iQool manual already in my posession that came with my electriQ iQool 12000 BTU Wall Mounted Air Conditioner with Heating Function dedicated to setting up the Tuya app. There goes several hours of my life paid in stupid tax...
Anyway, ESPHome has Tuya compatibility and can talk to Home Assistant, so let's flash that to the Wifi module and get much more functionality through HA's fancy home automation. I'll remind you that my goal is to shout at Siri to turn on the garage AC (in heat mode because I live in Scotland come on). Success will be had.
The lower level control functions of the aircon are controlled by another microcontroller, so as far as I know there's not too much risk in flashing ESPHome or your own firwmare to the Wifi module. This other microcontroller also exposes various datapoints to the WiFi module like the measured temperature which is nice to be able to report back to Home Assistant.
Quick aside: IR remote spoofing kinda works
I'm including this section for those who want a solution that doesn't require either replacing the Tuya firmware or can't open the unit to flash the module.
ESPHome can spoof infrared remote controls, so I started there. Doing some debugging with
IRremoteESP8266, the protocol seems to almost
be TROTEC_3550 but more often than not the tool just ended up decoding the remote data as
Pronto, a generic IR waveform encoding format.
I did get the unit working over IR with Home Assistant using ESPHome's remote_transmitter
component but it felt quite brittle to me sending raw Pronto codes. I also wanted to read data back
from the AC which obviously isn't possible with a one way IR link, so I moved on to slightly more
involved hacks.
Please let me know if you'd like the Pronto codes - I still have the working ESPHome config floating around somewhere.
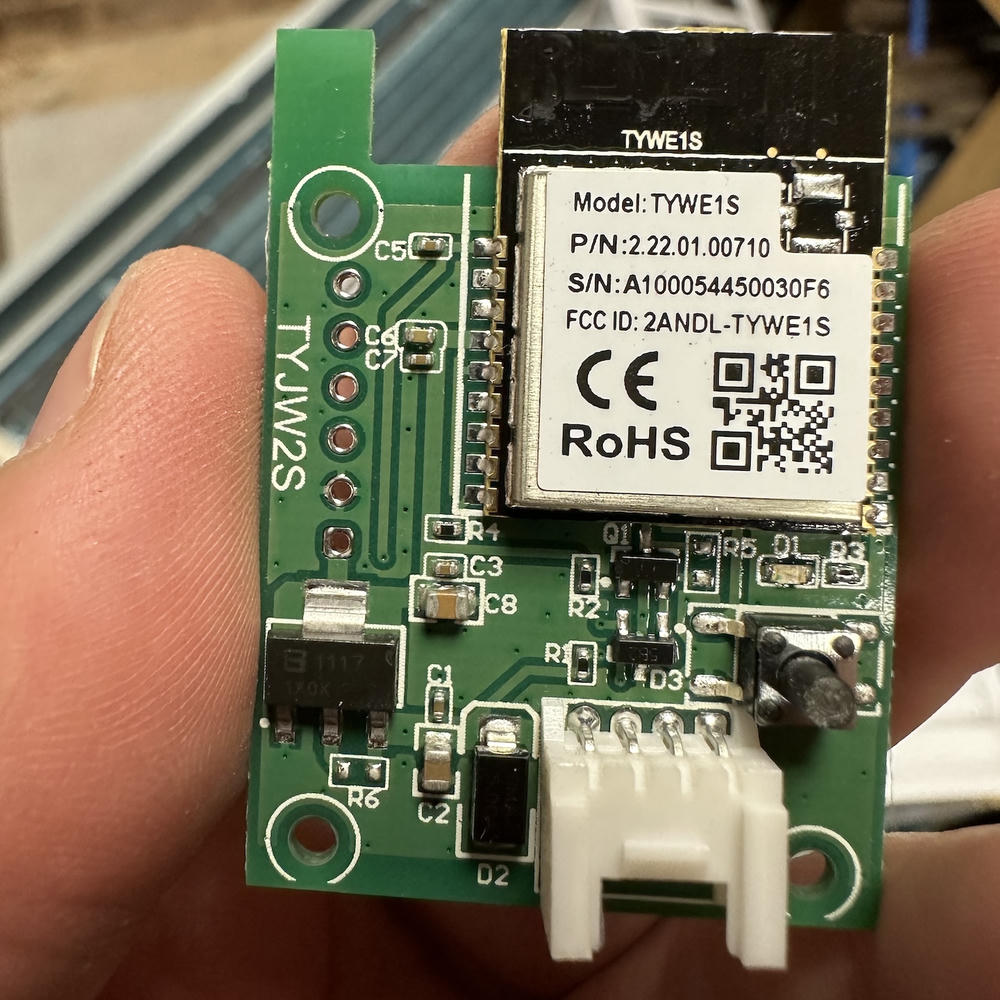
Firmware flashing connections for the the TYJW2S-5V-YA Tuya module
This module is a small breakout board for the TYWE1S system on module (or whatever you want to call it).
The way I flashed the first ESPHome firmware does require physical access to the WiFi module, but it
may be possible to hack it over the air by following
the ESPHome tuya-convert guide. I was
comfortable taking my unit apart but if you're not, you should still have an options in that guide.
That said I'm glad I did crack into my unit as the heat exchanger coil was missing screws! That's
what you get for buying B-grade I guess. Once ESPHome is flashed once and connects to your WiFi
successfully, you should be able to flash much more easily OTA.
You'll need a serial adapter to hook onto the wifi board. I used a Sipeed Slogic Combo8 but any serial adapter will work.
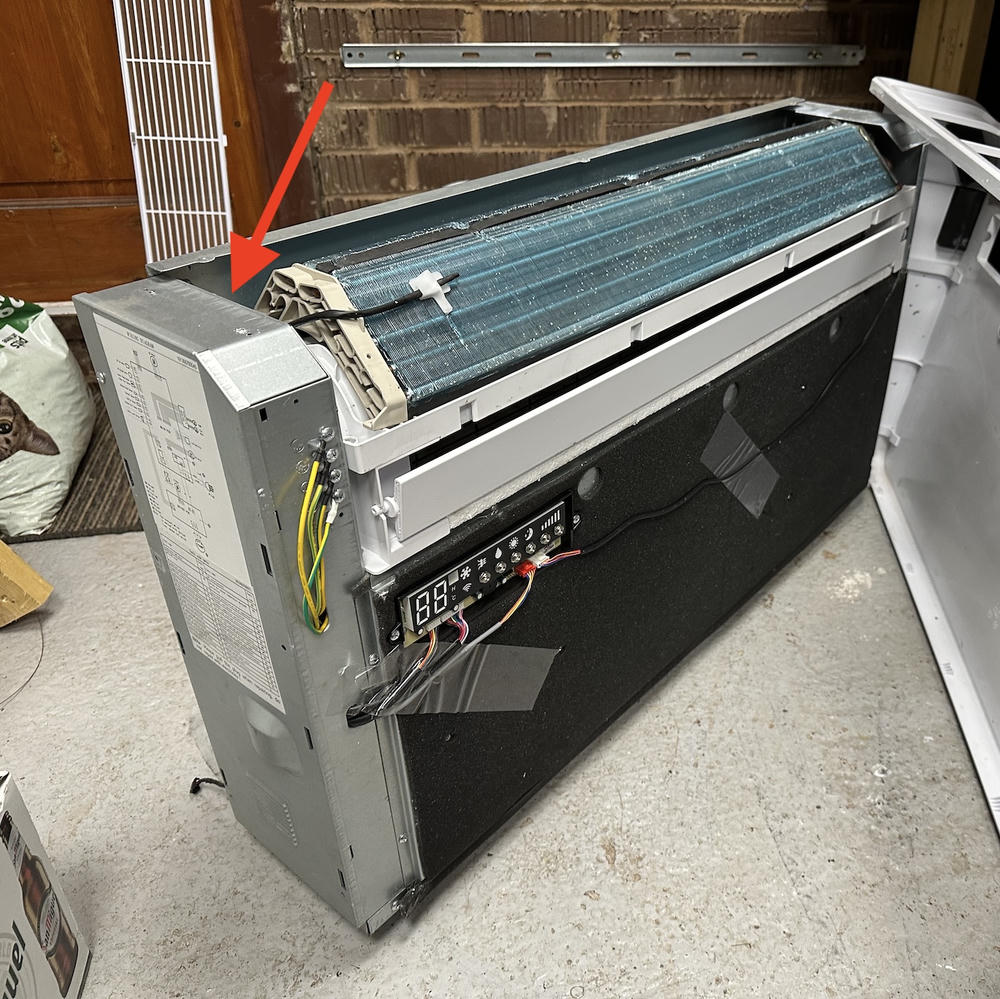
Once the case is removed, the Tuya module is in a black plastic case on the top left of the unit (red arrow in photo below). Unscrewing this is tricky without small screwdrivers as the heat coil is in the way, but is doable. Once the module is removed, you'll need to open the snapped together plastic case to reveal the module inside.
Connections
The Tuya TYJW2S-5V-YA datasheet shows the pinout as the following:
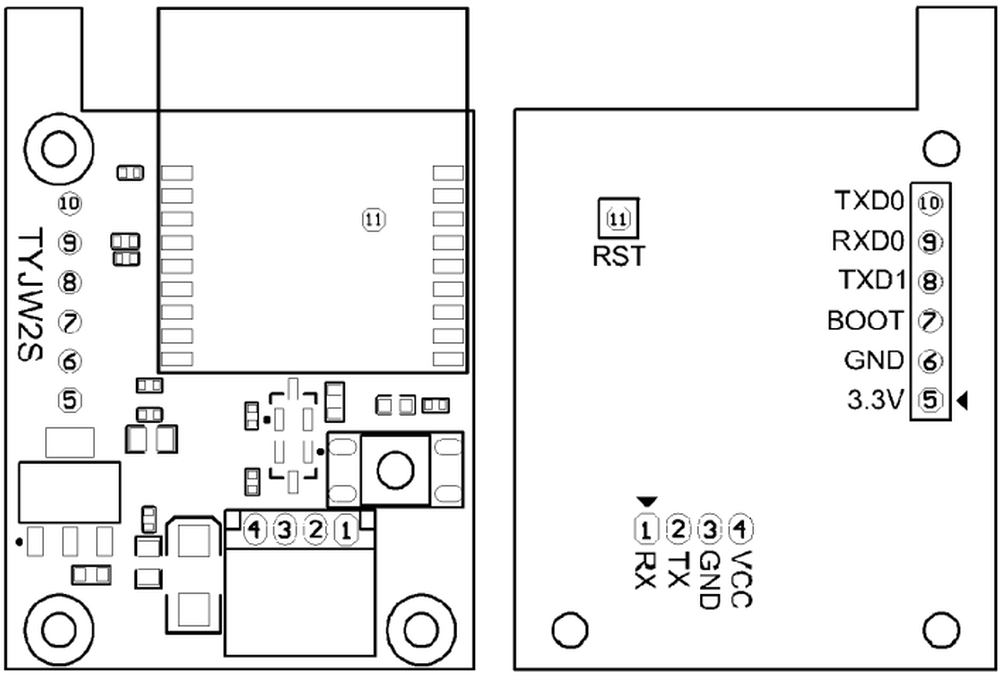
The lower 4 pins are the interface to the aircon control MCU. The pins up the side (TXD0, RXD0,
etc) is the programming/debug header. I'm going to use the unit's power from the 4 pin connector, so
I only connected TXD0, RXD0 and GND to my serial adapter.
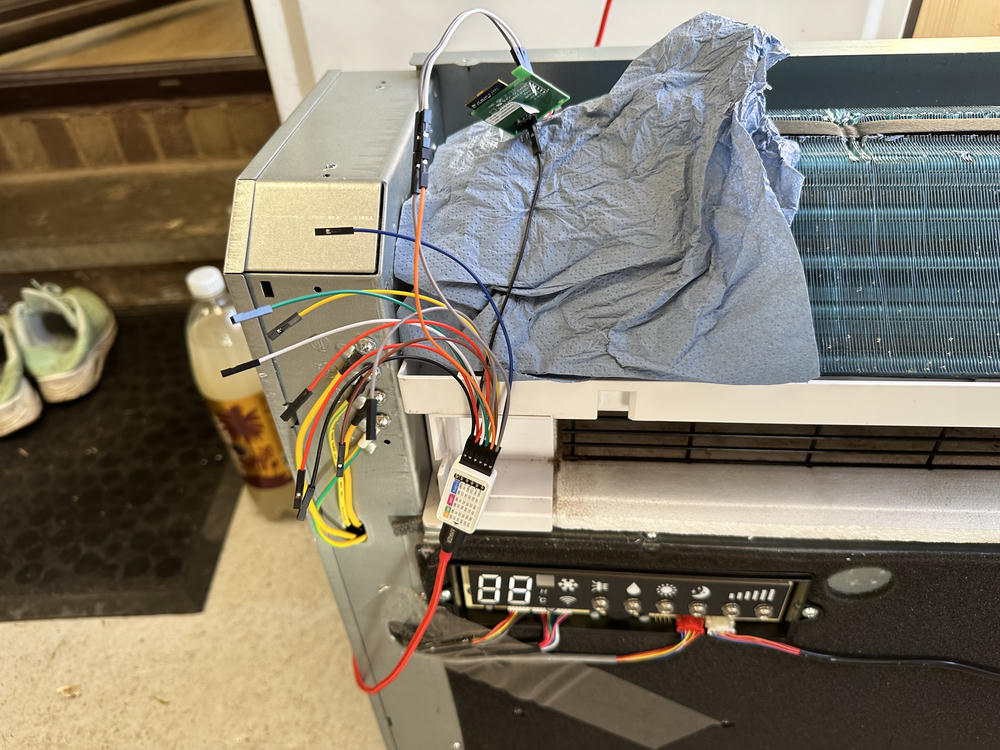
I got a bit... inventive with the wiring.
Flashing process
- Plug in AC unit
- Unplug the 4 pin connector on the WiFi module
- On your PC/laptop, run whatever command you want to send to the module, e.g.
esphome run ac.yamloresptool.py - Hold the single button on the module,
- Plug the 4 pin connector to the AC back into the module to repower it, then release the button. This puts the module in programming mode.
- The
esphome/esptool.pycommand should start communicating now. You might have to try this process a few times to get the command to bite as the timeouts are quite short.
Once ESPHome is flashed, you can update much more easily over the air.
Optional: back up the original firmware
For safety's sake I took a backup of the original Tuya firmware by following
this guide.
Make sure you have esptool installed (usually installed with esphome I think). My device has a
2MB flash. Here are the commands I used:
And to write the original firmware back to the device if you need to:
Don't forget to change the port to whichever one you're using!
The original firmware for my unit can be downloaded here if you need to reset to defaults. Do so at your own risk, however. I bear no responsibility for any damage or bricking of your unit.
The IR remote is still usable with ESPHome, and its state is propagated through to HA which is nice, however the state on the remote itself can't be updated externally, so any actions sent from the remote will clobber any settings in HA, meaning things like temperature setpoint and mode will all be changed to match the remote if you change the fan speed for example. Ah well, your phone is the remote now!
ESPHome configuration
The ESPHome configuration is pretty standard, although I did have to use some not-yet-merged (at time of writing) features made available in this PR. I had to fork that repo again here with some fixes to get the changes to compile with an updated ESPHome.
With luck, by the time you're reading this you can just use the tuya component straight from
ESPHome, but for now, I'm going to use this config:
---
esphome:
  name: garage-aircon
  # Let aircon unit boot up for 10s and initialise before we start reading stuff from it
  on_boot:
    priority: 800
    then:
      - delay: 10s

esp8266:
  # Tuya module has 2MB flash
  board: esp_wroom_02
Next we'll configure logging. Because the AC MCU talks over the UART normally used for logging
(UART0), we have to disable that, OR use UART1 (the TXD1 pin on the module):
# Disable logging over UART0 otherwise the AC MCU will be unhappy
logger:
  level: INFO
  # Set to non-zero value to enable logging
  baud_rate: 0
  # OR enable through TXD1 pin:
  # hardware_uart: UART1
For additional debugging, we can hook up the LED on the module as a status blinker. This is optional, or can at least be removed when you're sure everything is working.
output:
  - platform: gpio
    id: heartbeat_led
    pin:
      number: 5
      mode: output

interval:
  - interval: 1000ms
    then:
      - output.turn_on: heartbeat_led
      - delay: 100ms
      - output.turn_off: heartbeat_led
Now we need to set up UART0 to communicate over the 4 pin connector:
uart:
  id: connector_uart
  # Connector TX
  tx_pin:
    number: 15
    inverted: false
  # Connector RX
  rx_pin:
    number: 13
    inverted: false
    mode: input
  baud_rate: 9600
  # Uncomment to print everything TXed/RXed for debugging
  # debug:
  #   dummy_receiver: true
And enable the tuya component with no additional config:
tuya:
Now for the real magic: our climate component!
climate:
  - platform: tuya
    name: Garage AC
    id: iqool
    supports_heat: true
    supports_cool: true
    switch_datapoint: 1
    target_temperature_datapoint: 2
    current_temperature_datapoint: 3
    active_state:
      datapoint: 4
      cooling_value: 0
      fanonly_value: 1
      drying_value: 2
      heating_value: 3
    fan_mode:
      datapoint: 5
      low_value: 0
      medium_value: 1
      high_value: 2
    preset:
      sleep:
        datapoint: 101
    swing_mode:
      vertical_datapoint: 104
    visual: # Optional. Example of visual settings override.
      min_temperature: 16 °C
      max_temperature: 30 °C
      temperature_step: 1 °C
The next part is optional, but if you'd like to log AC state/data in something like Grafana, you'll need to add some sensors:
sensor:
  - platform: "tuya"
    name: "AC Measured Temperature"
    sensor_datapoint: 3
  - platform: "tuya"
    name: "AC Setpoint"
    sensor_datapoint: 2
  # - "0 -> Cool"
  # - "1 -> Fan"
  # - "2 -> Dry"
  # - "3 -> Heat"
  - platform: "tuya"
    name: "AC Mode"
    sensor_datapoint: 4
    accuracy_decimals: 0
  # - 0 -> Low
  # - 1 -> Med
  # - 2 -> High
  - platform: "tuya"
    name: "AC Fan Speed"
    sensor_datapoint: 5
    accuracy_decimals: 0

binary_sensor:
  - platform: "tuya"
    name: "AC On"
    sensor_datapoint: 1
Final words and some additional details
This setup has been working flawlessly. I'm really happy I can reuse all original firmware for a super clean hack - it's just software! The only thing I couldn't get working is the PTC heater in my unit. Apparently this is only controllable through the remote as I didn't find any Tuya datapoints that changed when I enabled/disabled the PTC.
For future reference, here are the mappings I determined by mashing buttons on the remote and looking at the log output:
| Datapoint | Function |
|---|---|
| 1 | On/off (standby) |
| 2 | Target temperature in ºC |
| 3 | Current measured temperature in ºC |
| 4 | Mode (cool 0, fan 1, dry 2, heat 3) |
| 5 | Fan speed (0 low, 1 medium, 2 high) |
| 101 | "Sleep" (quiet mode) preset on/off |
| 104 | Vertical swing on/off |
And here's what I was reading through from the ESPHome output:
[13:40:56][C][tuya:033]: Tuya:
[13:40:56][C][tuya:048]:   Datapoint 1: switch (value: OFF)
[13:40:56][C][tuya:050]:   Datapoint 2: int value (value: 6)
[13:40:56][C][tuya:054]:   Datapoint 4: enum (value: 0)
[13:40:56][C][tuya:054]:   Datapoint 5: enum (value: 0)
[13:40:56][C][tuya:056]:   Datapoint 106: bitmask (value: 0)
[13:40:56][C][tuya:056]:   Datapoint 111: bitmask (value: 0)
[13:40:56][C][tuya:054]:   Datapoint 19: enum (value: 0)
[13:40:56][C][tuya:050]:   Datapoint 3: int value (value: 13)
[13:40:56][C][tuya:048]:   Datapoint 101: switch (value: OFF)
[13:40:56][C][tuya:048]:   Datapoint 102: switch (value: OFF)
[13:40:56][C][tuya:048]:   Datapoint 104: switch (value: OFF)
[13:40:56][C][tuya:054]:   Datapoint 110: enum (value: 0)
[13:40:56][C][tuya:050]:   Datapoint 105: int value (value: 0)
[13:40:56][C][tuya:050]:   Datapoint 103: int value (value: 0)
[13:40:56][C][tuya:068]:   Product: '{"p":"2tgd3qnobb1mcgd9","v":"1.0.0","m":1}'
I'm curious to know what the bitmasks are - maybe defrost state, errors, something else? Who knows! But they were always zero when I inspected them. If I can be bothered, I'll grab some logs when the unit is in defrost mode and see if anything changes.