
Spindle speed control using LinuxCNC 2.7 with a Huanyang inverter
Huanyang branded VFD drives are ubiquitous on eBay and other sites like AliExpress. I bought one
some time ago with a 1.5KW spindle and have been controlling the speed manually with the difficult
to use control panel on the front. It is, however, possible to control the VFD from within LinuxCNC
using the M3 and M5 commands
(I haven't been able to get M4, reverse rotation, working yet). What's also neat is we can get the
machine to wait for the spindle to come up to speed before moving to the next line of GCode.
The first thing I tried was PDM using signals from the parallel port. This doesn't set the speed accurately at all and the PDM/speed conversion curve is hilariously inaccurate. If you want to try this method for whatever reason, there's a guide in the LinuxCNC documentation.
Most Huanyang VFDs have an RS-485 two-wire interface, so let's use this to communicate with the drive from LinuxCNC. These inverters supposedly support Modbus but aren't compliant, so a custom HAL component for LinuxCNC is required. Since LinuxCNC 2.7, this component is now bundled with the default image as a HAL component, so all we need to do is set it up properly. Easy!
Hardware required
- A computer running LinuxCNC 2.7+ with at least one USB port
- A USB ↔ RS-485 converter. I got one on eBay for less than a fiver. You could use an RS-232 to RS-485 converter too
- Huanyang VFD
- Two core signal (light gauge) wire to hook up between the VFD and converter. I used one of the twisted pairs out of an ethernet cable. The twistedness might help over very long distances as RS-485 is differential. For shop use it doesn't really matter.
VFD configuration
We first need to change some settings in the VFD. Most of these settings are identical to those
defined in the hy_vfd man page so look there
if you need more information. Running hy_vfd --help from a terminal will give you the same
helptext.
Change the following registers to make the VFD listen on the RS-485 bus for control signals:
| Register | Value | |
|---|---|---|
| PD001 | 2 | Listen for run commands on the RS-485 bus |
| PD002 | 2 | Listen for frequency/speed commands on the RS-485 bus |
| PD164 | 3 | Baud rate - 38400 baud |
| PD165 | 3 | Communication data method to 8N1 RTU |
Check your VFD manual for other values for these registers. I've included a PDF of the manual here if you've lost the one included with your VFD.
LinuxCNC Configuration
For completeness' sake, I'm making available my entire machine config [here]({{ site.files }}/hy-vfd-config-rs485.zip) to help make configuring the VFD clearer if you need it. Read on for step by step config instructions and make reference to the config files in the download if need be. It's provided purely as an example of what to add to it to get the Huanyang VFD working, so don't use it on your machine verbatim.
I didn't need most of the signals made available by the hy_vfd module so I didn't add them to the
configuration. You can add them yourself by looking at the HAL meter in LinuxCNC for the names.
Note: Using stepconf again will overwrite some of your custom settings. The INI and other config files will have to be edited by hand, which is not that hard. You can always use stepconf to test things without saving and then edit the files manually later.
custom.hal
# Include your customized HAL commands here
# This file will not be overwritten when you run stepconf again

# Load the Huanyang VFD user component
loadusr -Wn spindle-vfd hy_vfd -n spindle-vfd -t 1 -d /dev/ttyUSB0 -p none -r 38400 -s 1

#net vfd-comms halui.machine.is-on => spindle-vfd.enable
setp spindle-vfd.enable 1
net spindle-fwd motion.spindle-forward => spindle-vfd.spindle-forward
net spindle-reverse motion.spindle-reverse => spindle-vfd.spindle-reverse
net spindle-speed-cmd  motion.spindle-speed-out-abs => spindle-vfd.speed-command
net spindle-on motion.spindle-on => spindle-vfd.spindle-on
net spindle-at-speed motion.spindle-at-speed => spindle-vfd.spindle-at-speed
It's worth explaining this line in more detail:
loadusr -Wn spindle-vfd hy_vfd -n spindle-vfd -t 1 -d /dev/ttyUSB0 -p none -r 38400 -s 1
- Assumes the serial port is located at
/dev/ttyUSB0(because I'm using a USB converter here). If you're using a serial port directly, use/dev/ttys0or similar. -p none -s 1assumes the VFD's PD165 register is set to3, which is 8N1 for RTU (Remote Terminal Unit) mode. The hy_vfd HAL module doesn't support ASCII modes.-r 38400sets the communication speed to 38400 baud. You need to make sure PD164 is set to3to match this value.
All options for the hy_vfd command are explained in
the user manual.
custom_postgui.hal
# Include your customized HAL commands here
# The commands in this file are run after the AXIS GUI (including PyVCP panel) starts

net spindle-at-speed => pyvcp.spindle-at-speed
net pyvcp-spindle-rpm spindle-vfd.spindle-speed-fb => pyvcp.spindle-speed
net pyvcp-modbus-ok spindle-vfd.hycomm-ok => pyvcp.hycomm-ok
custompanel.xml
We want/need to display some info about the VFD in the LinuxCNC interface, so we'll write a PyVCP panel to do so.
This panel is a stripped down version of the default supplied in the original hy-vfd module. There
is a downloadable ZIP in the
original forum thread
containing the complete panel XML if you wish to set up extra fields. Note that you'll have to add
more signals in your .hal files, and change the signal names in the PyVCP XML.
All I need from the panel is the spindle RPM, a spindle-at-speed indicator and a Modbus comm OK light. It currently looks like this (panel on the right):
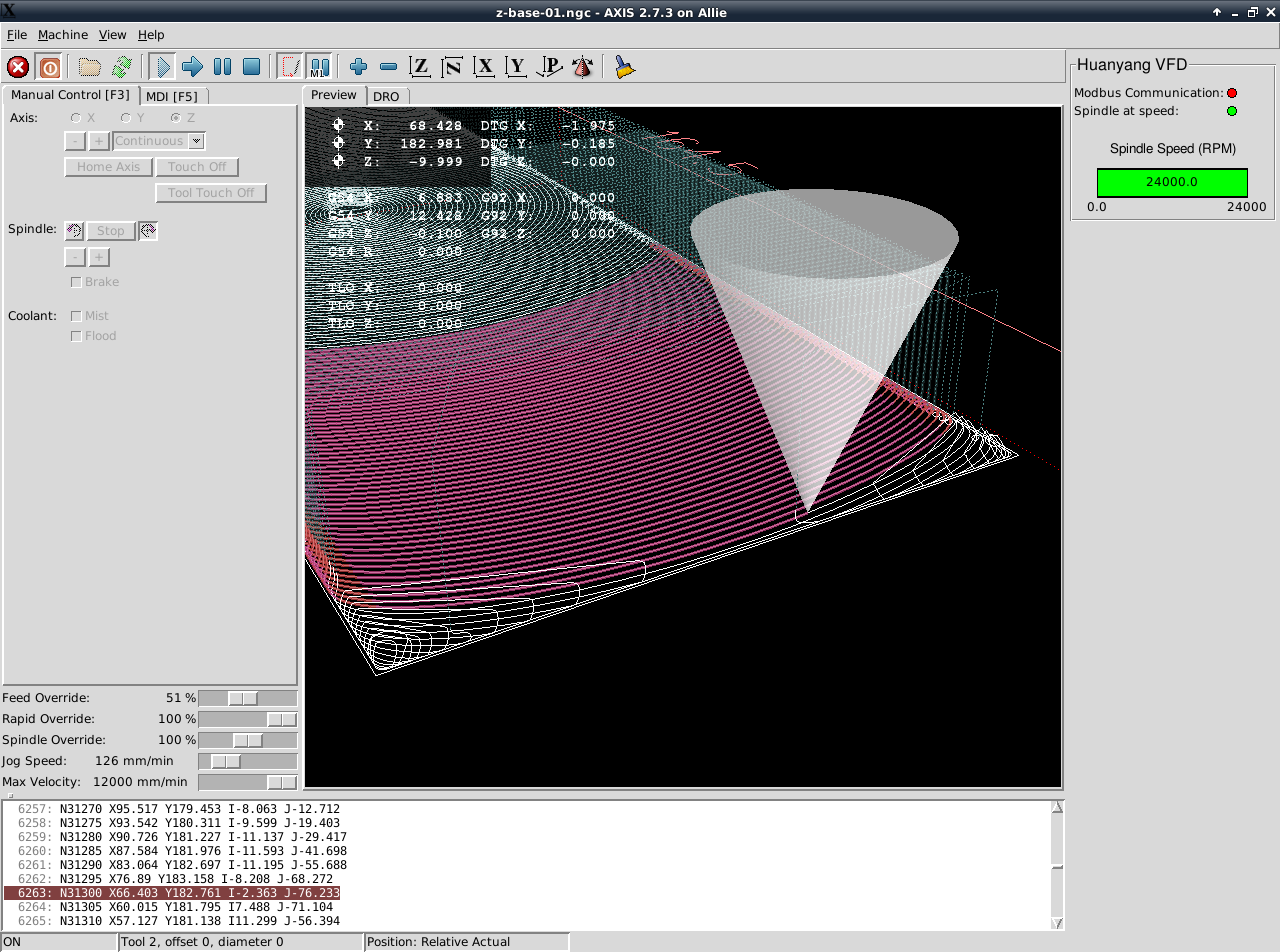
And here's the PyVCP XML to generate it:
("Helvetica",12)
" "
("Helvetica",2)
"Modbus Communication:"
"hycomm-ok"
"10"
"green"
"red"
"Spindle at speed:"
"spindle-at-speed"
"10"
"green"
"red"
" "
"Spindle Speed (RPM)"
("Helvetica",10)
" "
("Helvetica",2)
"spindle-speed"
24000
It would be cool to have a tachometer type gauge and perhaps some more info, but this shows all the information I need.
Machine.ini
We need to get LinuxCNC to load the custom panel and wiring. To do so, modify the machine .ini
file. This is the .ini file inside the folder created by Stepconf. If your machine is called
Allie like mine, this will be Allie/Allie.ini.
Find the [DISPLAY] section and add the following line to load the custom control panel (assuming
you called the file custompanel.xml):
PYVCP = custompanel.xml
Next, find the [HAL] section and add these lines if they're not already present:
HALFILE = custom.hal
POSTGUI_HALFILE = custom_postgui.hal
Usage
- Start LinuxCNC
- You should see the custom control panel on the right
- Home all axes to allow manual control if required
- Go to the MDI panel (F5) and type
M3 S5000to start the spindle at 5k RPM. RunM5to stop. The display on the VFD when set to show frequency should show a value close to 5000 RPM. You should also be able to useM4(reverse rotation), but you'll need to setPD023to1on the VFD to enable it (untested). - To see the spindle-at-speed indicator in action, enter
M3 240000from stopped to see thespindle-at-speedLED stay red until 24k RPM is reached after a couple of seconds. It is important that this works otherwise LinuxCNC won't wait for the spindle to come up to speed before starting a cut.
Final notes and gotchas
- The VFD takes some time to respond to speed commands. This can be an issue with emergency stops because the spindle won't stop until about 2 seconds after the button is pressed. I've ruined a few tools because of this.
- VFD must be on before you open LinuxCNC, otherwise HAL component will not start comms properly (component is loaded at startup and only attempts connection on load)
- I had huge trouble getting the VFD to communicate. Simple solution: make sure
spindle-vfd.enableis set to1. Modbus comms okLED in PyVCP goes red during run; possibly because bus is busy reporting values back or whatever. We don't really care, you just don't want it red when the spindle is stopped.